Wednesday, April 30, 2008

ItaliaRican in the News

I almost forgot to mention that last month's appearance at the Gong Show at Arlene's Grocery actually got some attention from the New York Press, a weekly alternative newspaper.

For those unfamiliar with the original Gong Show, it was a televised talent show that ran in the 1970s and 80s with the main attraction being the giant gong that was hit to let crappy performers know it was time to get off stage. I was allowed to enter myself as a contestant, with my talent obviously being cooking and although I didn't win the grand prize, the judges didn't bang the gong, either!

I am mentioned briefly in the last paragraph.

There were also spring rolls going around the room made by Missy from the "italiaricankitchen." The whole experience was pleasantly bizarre.
It's only a blurb, but not a bad start.

Monday, April 28, 2008

ItaliaRican at Disco Crisco Twister!

I was at Disco Crisco Twister again last Sunday at Arlene’s Grocery handing out free samples of my kottonmouth kookies and pineapple inside-out spot cupcakes. The place was packed with people flooding through the doors for Disco Crisco Twister, a monthly event at Arlene’s where adults can unwind and play games like musical chairs (with a live band), sing that tune (with a DJ), pop culture trivia and Disco Crisco Twister, a more slippery version of the classic game. Disco Crisco Twister even has its own theme song which was performed by PuppetBox. No , I didn't get to sing the theme song on stage, but I still had a great time.

I chose the pineapple inside-out spot cupcake because this month's Disco Crisco Twister had a Hawaiian theme because they were holding a raffle with the prize being roundtrip airfare for two to Hawaii with seven nights hotel accommodation. Everyone was wearing plastic lays and
enjoying the sweet pineapple taste and coconut shavings of my cupcakes. I had also planned to bake the kottonmouth kookies in honor of 4-20 before I knew about the Hawaii trip, so I decided to serve those too.

I've been coming to Disco Crisco Twister for about four months now, serving edible freebies to promote my catering services and blog, and am now officially "the resident Disco Crisco Twister chef". Everyone asked me what was in my kottonmouth kookies. "It's not what you think!" I replied. So many people asked me privately if there were any "special herbs" in the cookies. Give me a break, folks! If there were, I certainly wouldn't be giving them away!

Much thanks to Dana Sterling, the founder of Disco Crisco Twister for letting me serve my food and participate in all the fun and games too. Arlene’s grocery is located at 95 Station Street (between Ludlow & Allen), in the Lower East Side at the 2nd Avenue station on the F line. Below are some pics from last Sunday's event, as well as a pic of myself and this month's co-host, Rich.

Friday, April 11, 2008

Kottonmouth Kookies (Legal Version)

Serves 25

In celebration of April 20th, I decided to come up with a sweet little cookie sure to keep you in the spirit of the holiday. This leaf-shaped green sugar cookie is sure to leave your mouth dry and your spirits high! This tasty treat is best enjoyed with friends in a circle. For this recipe you’ll need a leaf-shaped cookie cutter, like the one I bought from Stonerware. The guys at Stonerware must be botanists, they like plants so much!

You will need:

  • 1 rolling pin
  • 1 leaf-shaped cookie cutter
  • 1 lightly greased cookie sheet
  • 2 sheets of wax paper
  • 1 teaspoon
  • 1 pair of disposable latex gloves
  • 1 cooling rack
  • 1 mixing bowl
  • At least 25 small disposable zipper storage bags (optional)

Ingredients:

  • 1 18 oz. tube of sugar cookie dough
  • 2 1/2 teaspoons of green food coloring
  • At least 2 oz. of green sugar crystals

Preheat your oven to 350 degrees. Because you’re going to shape the dough and not just slice little discs of dough from the tube, it’s best to simply cut open the tube and squeeze the dough into a mixing bowl. Get your latex gloves ready, because this is where it gets too messy, even for me! Put on your gloves and add the green food coloring to the dough. Knead the dough until it is completely green. Place a sheet of wax paper on a stable flat surface and position your green glob of dough on it.

Remove the gloves and cover the glob with a second sheet of wax paper so the dough won’t stick to the rolling pin or the flat surface. Push the wax paper-covered dough down with your hand when you flatten it to about one half inch thick. Make sure the rolling pin rolls the dough horizontally as well as vertically so the dough isn’t stretched out into some oval shape. To do this, simply turn the wax paper and dough 90 degrees in either direction and roll the pin in the same vertical motion.

Once flattened, peel the top layer of wax paper off and firmly push the cutter down into the dough. Lightly grease the cookie sheet with cooking oil and place the shaped cookies on it. If the dough seems to be sticking to the cutter, gently push the dough out of the cutter with your fingers. When you run out of available space on the dough for your cutter, simply join together all the excess dough, cover it with second wax paper and flatten it again with the rolling pin. Keep this up until you have run out of unshaped cookie dough.

In the event that you end up with a piece of dough that is not big enough for the cookie cutter, simply roll it up in to a ball and slap it on the sheet with the rest of the cookies. After the cookies are baked, gobble up that little green cookie ball so no one else will ever know of its existence.

For more detailed instructions on how to roll dough and shape cookies, check out my new instructional video.

Sprinkle the green sugar crystals onto the shaped dough until the surface of the dough is completely covered. For chewy cookies leave them in the oven for about 8 to 10 minutes. But if you like your cookies with a crunch then keep them in for about 10 to 12 minutes. Let the cookies cool on the sheet or on a plate before storing them away or the cookies will stick together. I usually store my cookies in a tin with wax paper between them. The cookies should hold up for about two weeks or so, but kottonmouth kookies may end up being consumed before April 21!

If you want you can place each cookie in an appropriately-sized "baggie". Be sure to drink lots of water with your cookies. And remember, when handling a plate full of Kottonmouth Kookies among friends, munch, munch, pass!

Pineapple Inside-Out Spot Cake

Serves 16-20

Hey every one, happy spring! I hope you have been enjoying my recipes.

Since the weather is getting warmer and the outdoors are becoming more inviting, I decided to share a recipe that embodies warm weather and warm welcomes. It’s called pineapple spot cake. You may ask why it’s called pineapple spot cake and not upside down pineapple cake. I figured, why not use pineapples throughout the entire cake instead of only the bottom? Also, if you’ve ever seen the outside of a pineapple, you’ve noticed it is covered with brown spots. So I thought it would be cute to make a cake that looked like a pineapple turned inside out with chocolate chips for spots.

Pineapples always remind me of tropical weather and in many cultures pineapples are associated with the idea of welcoming someone. So try my new tasty recipe and enjoy it with your family and friends, or welcome someone new to your neighborhood, school or workplace with a slice or two.

You will need:

  • 1 greased medium sized square pan
  • 1 large mixing bowl
  • 1 whisk
  • 1 colander
  • 1 non stick pan
  • 1 teaspoon
  • 1 small bowl (optional)

Ingredients:

  • 18-20 oz. of any cake mix you like
  • 20 oz. of unsweetened crushed pineapple
  • 3 oz. of coconut flakes
  • 3 large egg white
  • 1/3 cup of water
  • 1/2 cup of vegetable oil
  • 12 oz. of mini semi sweet or bitter chocolate chips
  • 1/2 teaspoon of green food coloring (optional)
  • 16 oz. of whipped cream (optional)
  • 3 oz. of coconut flakes (optional)

Preheat your oven to 350 degrees. Place your coconut flakes in a non stick pan and lightly toast them for about five minutes. Put the toasted coconut aside as they will be used to garnish the top of the cake later. Drain the juice from the crushed pineapple in a colander and taste the juice to see if it’s too tart for you so that you can choose a proper topping later.

Take your cake mix, pour it into the mixing bowl and add the egg whites, drained pineapples, water, vegetable oil and chocolate chips and mix it all together. If you’re wondering why this recipe calls for unsweetened pineapples and semi sweet or bitter chocolate chips, it’s because the coconut flakes and whipped cream should make the cake sweet enough.

Once the ingredients are all incorporated, grease your square pan with some butter and pour the mixture into the center of the pan. Place the whole thing into the oven and bake for about 30 to 35 minutes until it turns a golden brown. If you're not sure if the cake is ready, insert a tooth pick into the center of the cake and pull it out. If it comes out clean the cake has fully cooked. If not, leave it in the oven for another 15 minutes and try the toothpick test once more.

* * *Topping your pineapple cake * * *

With this recipe I usually use either whipped cream or pineapple syrup. This is why I advised tasting the pineapple juice to see just how tart or mild it is. If the juice is a bit too tart for your personal taste, then the whipped cream is probably the best option for you as a topping, as its sugary base will counter against the tartness. But if you decide to use the juice as a topping, simply pour it into a saucepan and let it simmer over a medium flame until the water evaporates, leaving a thick syrup. Wait for the syrup to cool a bit before carefully pouring it onto the baked pineapple cake. This is what I meant by using the pineapple throughout as opposed to just on the bottom.

I like using coconut flakes for this recipe because like pineapples, they are also a tropical fruit. It’s necessary to use a glaze on the cake (either the whipped cream or the syrup) so the flakes can more easily stick to the cake. By now your toasted coconut flakes should have cooled down. Using your fingers, evenly sprinkle the flakes onto the cake’s surface.
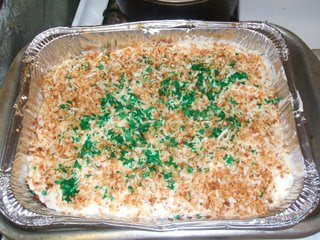
I also like to mix the toasted coconut flakes with green coconut flakes to keep up the whole tropical theme. It’s a little extra work but it sure does make the cake even prettier. Place about 3 ounces of coconut flakes into a small bowl and douse it with about a half teaspoon of green food coloring. Mix everything with the teaspoon until the white flakes are completely green and use your fingers to sprinkle the green flakes onto the cake.

P.S. If you'd like to sample my pineapple inside-out spot cake in cupcake format and meet me, you can do both this Sunday, April 27 from 7 to 10pm at Arlene's Grocery, 95 Stanton Street (between Orchard & Ludlow) in the Lower East Side, near the 2nd Ave. station on the F line.

Sunday, April 6, 2008

Garlic: Bad For Your Breath, Great For Your Palate

When some people hear the word garlic they automatically think of bad breath. But garlic has been known for thousands of years as both medicine and food. But this is a cooking blog, not a medical blog, so I'm going to discuss the culinary aspects of garlic, some of which you may be unfamiliar with.

I like to use garlic in every dish I prepare. Garlic can be crushed, minced, grated, or roasted. When I make a whole chicken I clean out the inside and rub it with a little salt then I take one small onion, a lemon, an orange and about half of a garlic head which equals about 8 cloves and I stuff it in the cavity. When the chicken is done roasting I discard the remaining.

Although people usually associate garlic with Italian cuisine, I was surprised to find out from the U.N. that the four largest producers of garlic in the world are China, India, South Korea and the United States, respectively. Italy isn't even in the top 20! Garlic is also a main ingredient in Latin American food. I thumb my nose at the bottled Puerto Rican sofrito and make my own!

And what Italian meal is complete without garlic bread? I use parsley in my garlic bread because it tends to weaken the strong scent and taste of the garlic.

Garlic bread recipe:

  • one baking pan or cookie sheet
  • a tablespoon
  • one loaf of Italian bread
  • 8 cloves of garlic, finely grated
  • 2 tablespoons of parsley
  • 2 table spoons of butter
  • 2 handfuls of grated parmesan cheese
  • salt and pepper
Cut the Italian bread length wide and smear the butter all over it. Add the grated garlic, parsley, parmesan cheese to the butter and bake in the oven for about 15 minutes until golden brown. And if you're nervous about your breath smelling bad from eating garlic bread, just make sure everyone at the table has some so no one will make fun of your garlic breath. Also, if you're worried about getting the garlic smell on your hands, just dip your hands underwater or under a running faucet and rub your palms and fingers against a stainless steel utensil like a fork or spoon. That should get most of the smell out from your hands.

I leave you with my top ten ways to enjoy garlic.
  1. Garlic bread
  2. Garlic butter (tastes great on corn on the cob and baked potatoes!)
  3. Spicy shrimp with garlic and white rice
  4. Roasted garlic mashed potatoes
  5. Garlic fries
  6. Sofrito
  7. Whole chicken
  8. Pork shoulder
  9. Garlic dip with vegetables of corn chips
  10. Cream of garlic soup
How do you like your garlic? Let me know in the comment area of this post and I'll try and come up with a recipe for it, or a twist on that recipe, if you already have it.

Tuesday, March 11, 2008

Irish Soda Bread

Serves 3-4 (two slices per person)

Nothing goes better with St. Patrick's Day than beer, and nothing goes better with beer than the dry, sweet taste of Irish soda bread! Irish soda bread is easier to make than most people think, and there's so many delicious ways to make it.

In New York, people (especially Irish-Americans) can get picky about their soda bread. Some argue that it's only soda bread if it's plain. If it has raisins in it, then it's not soda bread, it's something else. Personally I say, this is America, and Irish soda bread should have the freedom to be whatever it wants to be and still be called Irish soda bread. Some people put nuts and cranberries in their soda bread. If the topping tastes good to you, by all means, put it in the soda bread.

Irish soda bread was first invented in the 1840s when baking soda was first introduced to Ireland. Because Ireland's climate isn't good for growing hard wheat, baking soda replaced yeast as the ingredient that makes bread rise when baking. Traditionally, Irish soda bread has two long intersecting lines cut into the top that form a cross. Legend has it that the Irish did this to ward off evil. But as you can see from the photo above, I like to just slash three quick lines across and three more down on mine. In either case, the cuts are there to allow the air inside to escape easily so the bread can expand while baking and not explode. So whether you like to carve a cross, little xs, tic-tac-toe or even carve your initials into the bread, it really doesn't matter as long as the cuts are there.

You will need:
  • a measuring cup

  • a large bowl

  • a whisk

  • a spatula

  • a baking sheet

  • a knife

  • a tray or other large, flat surface that can be covered with flour, at least 10" on each side

  • a teaspoon

  • a cooling rack
Ingredients:

  • 3 1/2 cups all-purpose flour or wheat flour

  • 1 3/4 cups cake flour

  • 1 teaspoon baking soda

  • 2 teaspoons fine salt

  • 1/4 cup unsalted butter, cut into small pieces

  • 1 1/2 cups buttermilk, chilled
Preheat your oven to 400 degrees and lightly grease your baking sheet with a bit of unsalted butter. In a large bowl, whisk together the flour, cake flour, baking soda, and salt. Add the butter and, using your hands, work it into the flour mixture. Add buttermilk and stir with a spatula until the flour is moistened and takes on a sticky, doughy texture. Using your hands, scoop the dough out of the bowl and place it onto a flour-covered work surface and knead lightly for about 1 minute. Shape the dough into a ball before lightly flattening down the top until the dough takes on the shape of a flying saucer.

Using a sharp knife cut at least two quarter-inch-deep criss-crossing lines into the top of the dough before placing it on the center of the baking sheet. This will allow air from inside to escape so that the bread can expand without exploding. Bake for about one hour or until the bread is golden brown and the bottom sounds hollow when tapped lightly with your knuckles. Transfer the bread from the sheet to a cooling rack and let it cool completely before serving.

Don't worry if your soda bread is too dry; that's why God invented beer! If you've got the stomach for it, try your soda bread with a pint of Guinness.

Happy St. Patrick's Day!
P.S. If you'd like to sample my Irish Soda bread and meet me, you can do both this Sunday, March 16 from 7 to 10pm at Arlene's Grocery, 95 Stanton Street (between Orchard & Ludlow) in the Lower East Side, near the 2nd Ave. station on the F line.

Monday, March 3, 2008

Spring Rolls

Makes 20-25 rolls

Spring rolls are a great hors devour that will satisfy nearly every pallet. While many Americans may have eaten spring rolls in Chinese restaurants, these fried treats are popular in many other Asian countries including Vietnam, the Philippines and Indonesia. I like to dip my spring rolls in duck sauce, but I know people who dip theirs in everything from ketchup to soy sauce to mustard to wasabi. This recipe does call for some rather exotic ingredients such as hoisin sauce and oyster sauce. If you don't live near an Asian neighborhood like I do, you might be able to find these items in the ethnic foods section of your supermarket or order it online.

You will need:

  • a tablespoon
  • a skillet or wok
  • a deep fryer or pot large enough for deep frying
  • a knife
  • a wooden spoon
  • a chopping board or plate
  • a box grater or peeler
  • a measuring cup
  • a small bowl half filled with water
  • a small pastry brush
Ingredients:
  • 1 tablespoon vegetable oil
  • 1/2 tablespoon minced garlic
  • 1 cup chopped cabbage
  • 1 medium-sized carrot, grated
  • 1/4 cup bean sprouts
  • 1/2 tablespoon hoisin sauce
  • 1/2 tablespoon oyster sauce
  • 1 tablespoon chopped coriander
  • 1 package of 20-30 square wonton or egg roll wrappers
  • vegetable oil, for frying
  • salt and pepper
  • 4 ounces ground meat (optional)
Part 1: Making the filling

Heat two tablespoons of oil in a skillet or wok over high heat. Add the garlic, coriander, cabbage, carrot, and bean sprouts. Cook for 2 minutes or until the cabbage is limp. Add the ground meat (optional) and continue to cook until heated through. Stir in the hoisin and oyster sauces. The filling should be moist but not wet. Remove skillet from heat and allow to cool. Toss in a little salt and pepper to taste.

Part 2: Creating the spring rolls

Ideally, the size for a spring roll should be rectangular and about an inch or so in width (the length doesn't really matter as long as the wrapper is long enough to wrap around the spring roll at least twice) so if the wrappers you find are too wide, just cut them in half. Note: It is highly recommended that you watch my spring roll video to learn how to wrap a spring roll. Lay a wonton (or egg roll) wrapper on a flat surface and place 2 teaspoons of the filling near one corner of the wrapper. Dipping your pastry brush (you can use your finger if you don't have a brush) into the water, lightly moisten the long sides of the wrapper before folding them inward. The water will help the wrapper stick together. Take the wrap and using your thumbs to push the wrap forward and your index and middle fingers to tuck the filling inside, roll the whole thing up as you would a loose cigarette. Paint the top seam of the wrapper with water to seal it. Pour about 1-inch of oil in a skillet and fry the spring rolls for 2 minutes, turning them over to make sure all sides are cooked. Drain your golden brown rolls on paper towels before serving.

P.S.: My spring rolls were a hit at Arlene's Grocery last Sunday, where they held their first ever Gong Show. For those unfamiliar with the original Gong Show, it was a televised talent show that ran in the 1970s and 80s with the main attraction being the giant gong that was hit to let crappy performers know it was time to get off stage. My talent was obviously the cooking and although I didn't win the grand prize, the judges didn't bang the gong, either!